I’m excited to share my favorite recipe for mini pita pizzas that has become a staple in my household for quick and healthy meals. These tasty pizzas are loaded with fresh vegetables, making them a nutritious and satisfying option for family dinners.
Using pita bread as the base eliminates the need for making pizza dough from scratch, making this recipe incredibly easy to prepare. Everyone in the family can customize their own pizza with their favorite toppings, ensuring that there’s something for everyone.
This recipe is perfect for busy weeknights when you need a meal that comes together quickly but still feels special. I’ll walk you through the simple ingredients and provide some creative variations to keep this recipe in your regular rotation.
Why These Mini Pita Pizzas Are a Game-Changer
Pita pizzas have emerged as a game-changer for families seeking healthy, quick, and affordable meals. They offer a perfect blend of nutrition and convenience, making them an ideal choice for busy households.
Ready in Just 20 Minutes
One of the standout features of these mini pita pizzas is their quick preparation time. You can have a delicious meal ready in just 20 minutes, making them perfect for weeknight dinners or sudden gatherings. With a
, you can satisfy your pizza cravings without spending hours in the kitchen.
Budget-Friendly Family Meal
These pita pizzas are not only quick but also budget-friendly. The basic ingredients like pita bread, sauce, cheese, and vegetables are affordable staples that won’t strain your grocery budget. You can make multiple pizzas from one package of pita bread, making it a cost-effective option for feeding a family. The nutritional profile is also impressive, with a good balance of carbohydrates (19g), protein (16g), and fat (12g), along with 2g of fiber and 4g of sugar per serving, totaling 247kcal.
By adjusting toppings based on what’s on sale or in season, you can further reduce costs. Unlike restaurant pizzas, you can load these pita pizzas with nutritious toppings without a significant price increase, making them a healthy and economical choice.
Ingredients for Perfect Mini Pita Pizzas with Fresh Veggies
Creating the perfect mini pita pizzas starts with selecting the right ingredients. The quality of your toppings and base can make or break your pizza.
The Pizza Base Essentials
The foundation of a great mini pita pizza begins with the pita bread, sauce, and cheese. For an authentic taste, use high-quality ingredients like fresh mozzarella and homemade or store-bought pizza sauce.
Fresh Veggie Toppings to Try
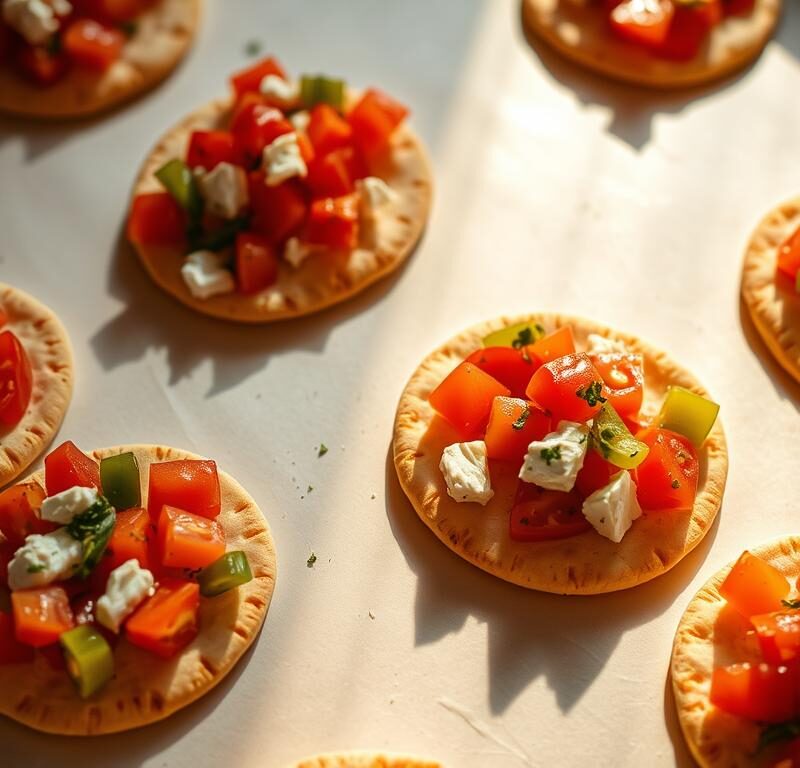
The vegetable toppings are where you can get creative and boost the nutritional value. Some great options include colorful bell peppers, thinly sliced mushrooms, black olives, and fresh tomato slices. You can also try broccoli florets, onions, and a sprinkle of fresh oregano for added flavor.
| Topping | Flavor Profile |
|---|---|
| Black Olives | Salty, savory |
| Roasted Red Peppers | Sweet, slightly smoky |
| Mushrooms | Earthy, umami |
| Broccoli | Fresh, slightly bitter |
Step-by-Step Cooking Instructions
Let’s dive into the step-by-step process of making mouth-watering mini pita pizzas. This process involves a few simple steps that will have your pizzas ready in no time.
Preparing Your Pita Bread
Start by preheating your oven to the right temperature. While the oven is heating up, prepare your pita bread. You can lightly toast it or leave it as is, depending on your preference for crispiness.
Adding Sauce and Cheese
Cover the pitas with 1/4 cup of your favorite sauce and 1/4 cup of cheese. Add slices of black olives and other desired toppings. If you like a bit of spice, sprinkle some crushed red pepper flakes on top.

Arranging Your Fresh Veggies
Now comes the fun part – arranging your fresh vegetables on top of the cheese layer. Thinly slice or chop your vegetables to ensure they cook evenly. Consider the moisture content of your toppings to avoid a soggy pizza. Arrange your toppings evenly and transfer the baking sheet to the preheated oven, placing it on the bottom rack to crisp up the pita base. Bake for 7-10 minutes, or until the cheese is melted and bubbly.
Creative Veggie Topping Combinations
Elevate your pizza night with creative veggie topping combinations that are both delicious and visually appealing. I love experimenting with different vegetables to create unique pita pizzas that are perfect for a quick meal or a fun dinner with family.
Mediterranean Style with Feta and Olives
For a classic Mediterranean twist, top your pita pizza with feta cheese, Kalamata olives, artichoke hearts, and sun-dried tomatoes. This combination is a flavorful and satisfying option that’s sure to become a favorite.
Colorful Garden Medley Options
A colorful garden medley topping combination is a vibrant and nutritious option. Start with a traditional tomato sauce base or a pesto sauce for a fresh herbaceous flavor. Layer on a variety of vegetables like yellow bell pepper, red cherry tomatoes, purple red onion, green zucchini ribbons, and orange carrot shreds. The key is to mix different textures and flavors, including something crunchy like bell pepper, something earthy like mushrooms, and something leafy like spinach. This topping combination pairs well with a simple side salad for a complete meal.

- Use a variety of colorful vegetables to make your pita pizzas visually appealing.
- Mix different textures and flavors to keep your toppings interesting.
- Consider a Mediterranean-style combination with feta and olives for a classic flavor.
Pro Tips for Crispy, Delicious Pita Pizzas
Elevate your pita pizza game with these simple yet effective tips. Making delicious pita pizzas is all about balance and technique.
Getting the Perfect Crispy Base
To achieve a crispy base, start with whole-wheat pita bread and bake until golden. A perfectly toasted pita pizza bread is essential for a great pizza.
Balancing Flavors and Textures
Balance your toppings by combining marinara sauce, mozzarella cheese, and fresh veggies like zucchini. Don’t overload your pita pizza with too many toppings, as this can make the bread soggy. A sprinkle of oregano or basil can enhance the flavor.

Exciting Variations to Customize Your Pizzas
The versatility of mini pita pizzas allows you to experiment with a wide range of flavors and ingredients. This flexibility makes it easy to create different versions to suit various tastes and dietary needs.
Alternative Sauce Bases
While traditional tomato sauce is a classic choice, you can also explore other sauce options like pesto, garlic butter, or even a white sauce made with olive oil and herbs. These alternative sauce bases can add a unique twist to your mini pita pizzas.

Protein Add-Ons for Heartier Pizzas
Adding protein can transform your mini pita pizzas into more filling meals. Consider options like cooked, shredded rotisserie chicken, crumbled tempeh, or Italian-style proteins such as pepperoni or sausage. Be mindful of the fat content when adding protein, as some options like pepperoni can be high in fat. With these protein add-ons, you can create different variations to suit various dietary preferences or nutritional goals.
Serving and Storing Your Mini Pita Pizzas
Enjoying mini pita pizzas is easy, whether you’re having a family dinner or a gathering. These mini pizzas are best served fresh and hot from the oven, paired with a fresh green salad for a well-rounded meal.
For a fun twist, consider setting up a build-your-own pizza bar where everyone can customize their mini pitas. The size of these pizzas makes them ideal for appetizers or lunch box additions.
While best enjoyed fresh, leftovers can be stored in an airtight container in the refrigerator for up to 3 days. To reheat, use a toaster oven or regular oven at 350°F for about 5 minutes to restore crispiness.